Cauliflower Crust Pizza

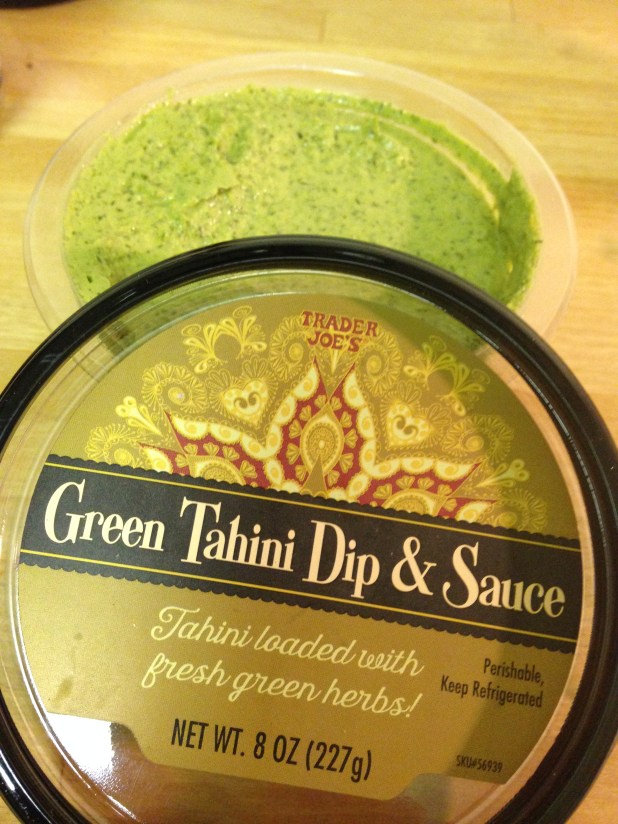
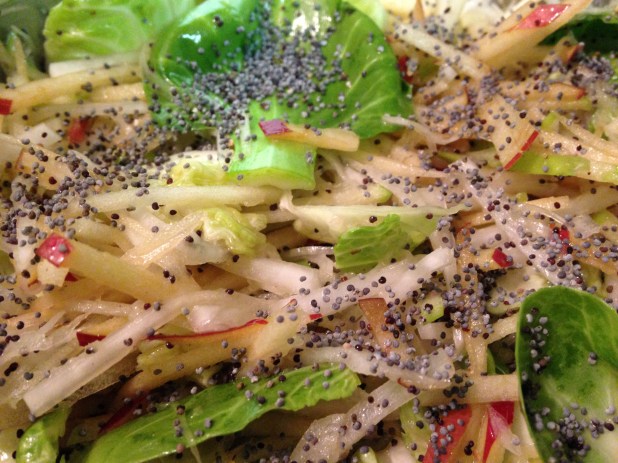
Over a month ago I was strolling through Trader Joe’s and saw this frozen riced cauliflower and just had to grab it, why not?  Then last week I was going to a friend’s place for a potluck dinner and (1) wanted to try something new and (2) she is gluten intolerant. I remembered I had the riced cauliflower so had to see what I could use it for. Started looking stuff up and came across some recipes for Cauliflower Crust Pizza. That sounded great! Especially since my cauliflower was already riced.  The recipe I ended up using was from the Lucky Penny Blog.  It’s both gluten and dairy free.

image

Ingredients

1 medium sized head of cauliflower – should yield close to 3 cups once processed (this is where I used the riced cauliflower from Trader Joe’s)
1/4 teaspoon kosher salt
1/2 teaspoon dried basil (crush it even more between your fingers)
1/2 teaspoon dried oregano (crust it even more between you fingers)
1/2 teaspoon garlic powder
optional a few shakes of crushed red pepper
2 tablespoons almond meal (my friend has a Vitamix — this took 2 seconds to make)
1 tablespoon (or more if desired) nutritional yeast (you could also omit this entirely if you like) — didn’t use it
1 tablespoon olive oil
1 egg

Directions

-Place a pizza stone in the oven, or baking sheet if you don’t have a pizza stone. Preheat oven to 450 degrees. On a cutting board, place a large piece of parchment paper and spray it with nonstick cooking oil or brush the parchment with olive oil.

*I skipped these next 2 steps with the riced cauliflower.

[Wash and throughly dry a small head of cauliflower. Don’t get one the size of your head unless you are planning on making 2 pizzas. Cut off the florets, you don’t need much stem. Just stick with the florets. Pulse in your food processor for about 30 seconds, until you get powdery snow like cauliflower. See above photo. You should end up with about 3 cups cauliflower “snow”. Place the cauliflower in a microwave safe bowl and cover. Microwave for 4 minutes. Dump cooked cauliflower onto a clean tea towel and allow to cool for a bit before attempting the next step.

Once cauliflower is cool enough to handle, wrap it up in the dish towel and wring the water out of it. You want to squeeze out as much water as possible. This will ensure you get a chewy pizza like crust instead of a crumbly mess.]

-Dump cauliflower into a bowl. Now add all your spices, your almond meal, your nutritional yeast (if using), and your olive oil. Mix the mixture to incorporate all the ingredients. Now add your egg and mix away again. Hands tend to work best.

-Once mixed together, use your hands to form the dough into a crust on your oiled parchment paper. Pat it down thoroughly, you want it nice and tightly formed together. Don’t make it too thick or thin either.

-Using a cutting board slide the parchment paper onto your hot pizza stone or baking sheet in the oven. Bake for about 12 minutes, or until it starts to turn golden brown and the edges crisp up. Remove from oven.  *It took a bit more time to cook that it called for.  This is likely because I forgot to heat the baking sheet before I put the pizza in the oven.  So I cooked it a bit longer, probably about 10 more minutes.

image

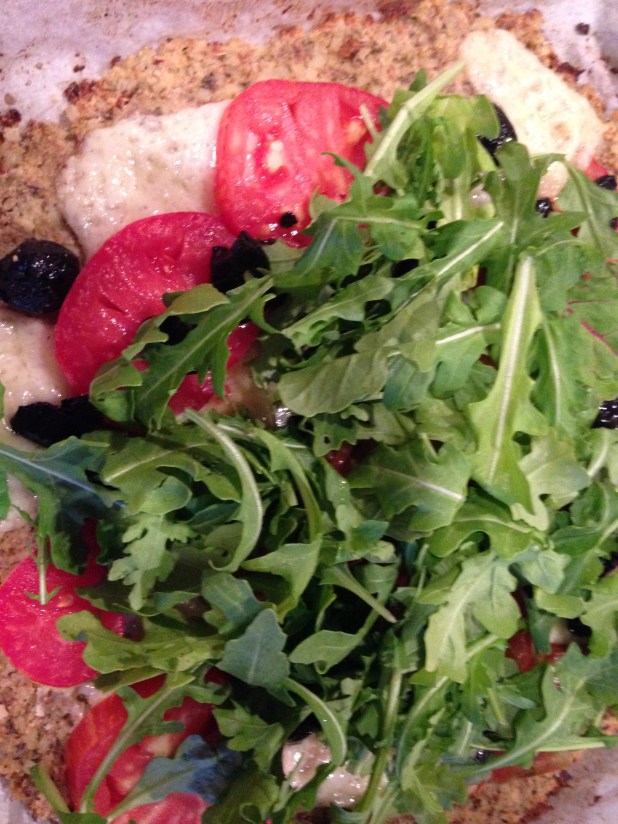
-Add your toppings and slide parchment with topped pizza back in the hot oven and cook for another 5 minutes until the toppings are warm. If using cheese for a topping, you can pop the pizza under the broiler to get the cheese melted fast without burning the crust.

I put manchego, olives and tomatoes on the pizza, then topped it with arugula when it came out of the oven.  It was a bit moist, but nice and crisp on the edges.  Very tasty and I’ll have to try it again.

image

New find

Was at Trader Joe’s the other day (not like that was something new) and they have done their typical thing of moving products around.  So now the hummus is pretty much right in front of you as you walk in the door at one of the locations I go to.  Had to check it out just in case I needed to pick some up.

I saw a new one…it’s not actually hummus but Green Tahini Dip and Sauce.  The ingredients: Tahini (Ground Sesame Seed), Water, Lemon Juice, Parsley, Green Onion, Dill, Mint, Dehydrated Garlic, Cilantro, Sea Salt, Cumin, Citric Acid.

It has some nice tang to it, great with veggies and the normal pita chips, etc.  Totally worth testing.  And, it’s lactose free and gluten free!

image

Brussels Sprout Salad with Toasted Sesame Vinaigrette

Need a nice refreshing salad with these crazy hot summer temps?  There is a great one from the March issue of Food & Wine.  It’s Brussels Sprout Salad with Toasted Sesame Vinaigrette.  The brussels sprouts aren’t cooked so it’s a nice cold salad.  And it’s lactose free and gluten free.

image

Ingredients

1/4 cup white sesame seeds
1 teaspoon finely grated lemon zest plus 1/4 cup fresh lemon juice
1 tablespoon white wine vinegar
1 garlic clove
1 teaspoon honey
1/4 cup plus 2 tablespoons extra-virgin olive oil
Kosher salt
Pepper
1 pound brussels sprouts, very thinly sliced
1 Pink Lady apple—halved, cored and thinly sliced
1 medium shallot, halved lengthwise and very thinly sliced
1 serrano chile—stemmed, seeded and very thinly sliced (I didn’t use this)
1/2 cup chopped mint
Black sesame seeds, for garnish (optional)

Directions

In a small skillet, toast the white sesame seeds over moderately low heat, stirring, until fragrant but not browned, about 3 minutes. Transfer to a blender and let cool. Add the lemon zest and juice, then add the vinegar, garlic and honey and puree until a chunky paste forms, about 1 minute. With the machine on, gradually add the olive oil and puree until nearly smooth, 1 to 2 minutes. Scrape the vinaigrette into a large bowl and season with salt and pepper.
Add the brussels sprouts, apple, shallot, chile and mint to the dressing and toss well. Season with salt and pepper and toss again. Garnish with black sesame seeds, if using, and serve right away.

image

It was so nice and crunchy with the sprouts and the apples, and so nice and cold.  Perfect with the crazy hot temps!

New veggie salad

Found a new recipe to try from a recent issue of Health magazine, Tomato, Cucumber and Green Bean Salad with Walnut Dressing.  Sounded perfect for these hot days.

Ingredients

1/3 cup broken walnut pieces
1 cloves garlic, chopped
1 teaspoon coarse salt
1 tablespoon extra-virgin olive oil
3 tablespoons red wine vinegar
1/2 pound green beans, stem ends trimmed, cut into 1-in. lengths (grabbed the frozen  ones from Trader Joe’s)
Salt
6 ounces grape tomatoes, halved (that quantity seemed low, almost doubled it)
1/2 cup thinly sliced (lengthwise) red onion
1/2 cucumber, peeled, seeded, halved lengthwise and cut into 1⁄4-in. slices (added more)
1/4 cup coarsely chopped fresh cilantro (I accidentally grabbed flat leaf parsley)
1/4 cup coarsely chopped fresh dill
1/4 cup coarsely chopped fresh mint

image

Preparation

1. Combine walnuts, garlic and salt in a food processor and blend until finely ground. (If preferred, walnuts, garlic and salt can be pounded into a paste with a mortar and pestle.) Combine walnut mixture, oil and vinegar in a salad bowl and whisk until blended. — I ended up with a nice paste.

2. Cook green beans in boiling salted water until crisp-tender, 4 to 6 minutes. Drain well, rinse with cold water, spread on a dish towel and pat dry.

3. Add green beans, tomatoes, onion, cucumber, cilantro, dill and mint to walnut dressing and toss to blend.

Very refreshing.  As mentioned, I grabbed parsley instead of cilantro, so it can likely taste even better than it did.  Nice for hot summer days.

image

Ratat-oooo-ille

Was in the mood for something hot and veggie-y and for some reason ratatouille came to mind.  Hadn’t made it for awhile and couldn’t find a recipe on hand, so what else to do than google it?  Came across a recipe on Bon Appetit that received many stars.

Ingredients

1 onion, sliced thin
2 garlic cloves, minced
5 tablespoons olive oil
a 3/4-pound eggplant, cut into 1/2-inch pieces (about 3 cups)
1 small zucchini, scrubbed, quartered lengthwise, and cut into thin slices
1 red bell pepper, chopped
3/4 pound small ripe tomatoes, chopped coarse (about 1 1/4 cups)
1/4 teaspoon dried oregano, crumbled
1/4 teaspoon dried thyme, crumbled
1/8 teaspoon ground coriander
1/4 teaspoon fennel seeds
3/4 teaspoon salt
1/2 cup shredded fresh basil leaves (totally forgot to grab this so had to use dry)

IMG_4741[1].JPG
Preparation

In a large skillet cook the onion and the garlic in 2 tablespoons of the oil over moderately low heat, stirring occasionally, until the onion is softened. Add the remaining 3 tablespoons oil and heat it over moderately high heat until it is hot but not smoking.

Add the eggplant and cook the mixture, stirring occasionally, for 8 minutes, or until the eggplant is softened. Stir in the zucchini and the bell pepper and cook the mixture over the moderate heat, stirring occasionally, for 12 minutes.

Stir in the tomatoes and cook the mixture, stirring occassionally, for 5 to 7 minutes, or until the vegetables are tender. Stir in the oregano, the thyme, the coriander, the fennel seeds, the salt, and pepper to taste and cook the mixture, stirring, for 1 minute. Stir in the basil and combine the mixture well.

The ratatouille may be made 1 day in advance, kept covered and chilled, and reheated before serving.

IMG_4746[1]

I added some extra tomatoes (had some canned ones that were easy to throw in).  I also added plenty of extra garlic, which never hurts.  This recipe hit the spot!  The first time I had it, it was enjoyed with some roast chicken and delicious french bread at my friend’s place.

Cauliflower Meets Immersion Blender

Another new magazine…  This time it’s a recent issue of Food & Wine and a recipe that caught my attention was Cauliflower Soup with Goat Cheese.  I read through it and it does call for dairy but it can so easily be eliminated.  It’s an accent (and really just unnecessary extra calories). The recipe is another great vegetarian (I used veggie stock because it’s what I had on hard), lactose free (you can nix the cheese, too, if needed, though goat cheese is good for most lactards) and gluten free one.

Ingredients

One 2 1/2-pound head of cauliflower, cored (went for a bag of frozen stuff, did 2-12oz bags)
1/4 cup extra-virgin olive oil
1 medium leek, white and light green parts only, coarsely chopped
1 large garlic clove, minced
Kosher salt
1 large baking potato, peeled and cut into 1-inch pieces
3/4 cup dry white wine
1 quart chicken stock or low-sodium broth (used veggie stock — great option for the vegetarian version)
3 thyme sprigs tied in a bundle, plus 1 teaspoon chopped leaves (used dried)
8 brussels sprouts (6 ounces), trimmed and separated into leaves (back to the freezer…so much easier)
4 ounces cold fresh goat cheese, crumbled (I actually used feta because I needed it for the next night, tasted great)
2 tablespoons snipped chives
1/4 cup heavy cream (nixed this so I could eat it)

IMG_4311[1]

Instructions

Preheat the oven to 375°. On a work surface, cut one-fourth of the cauliflower into 1/2-inch florets. Coarsely chop the remaining cauliflower.

In a large saucepan, heat 2 tablespoons of the olive oil. Add the leek, garlic and a generous pinch of salt and cook over moderate heat, stirring occasionally, until softened, 5 minutes. Stir in the potato and the chopped cauliflower, then add the wine and cook over high heat until reduced by half, 4 minutes. Add the stock and the thyme bundle and bring to a boil. Reduce the heat to moderately low and simmer, stirring occasionally, until the vegetables are very tender, about 30 minutes. Discard the thyme bundle (since I used dried stuff, it stayed in there).
Meanwhile, at either end of a large rimmed baking sheet, separately toss the cauliflower florets and brussels sprout leaves each with 1 tablespoon of olive oil and season with salt. Roast for 15 to 18 minutes, stirring each halfway through, until lightly browned and tender. In a small bowl, mix the goat cheese with the chives and chopped thyme.
In a blender (I used the much handier immersion blender), puree the soup in 2 batches until very smooth. Return the soup to the saucepan and stir in the cream (did do this). Rewarm over moderate heat, adding water if the soup seems too thick; season with salt. Ladle into bowls and top with the roasted brussels sprout leaves and cauliflower florets. Sprinkle the herbed goat cheese on top and serve hot.

IMG_4314[1]


Delicious soup!  The flavors all came together and worked so well.  Totally worth trying.

Make Ahead

The soup can be refrigerated for up to 3 days. Reheat gently before serving.

Avocado, Hearts of Palm & Heaven

When you read a recipe where all ingredients are ones that you absolutely love, you must make it.  I found this Avocado–Hearts of Palm Salad in Health magazine and had to try it ASAP.  And, it could not be easier to put together.

Ingredients

1 tablespoon extra-virgin olive oil
1 teaspoon lime zest
1 tablespoon lime juice
1 clove garlic, minced
1/4 teaspoon kosher salt
1 large ripe avocado, cut into 1/2-inch cubes
1/2 cup drained, coarsely chopped canned hearts of palm (about half a 15-oz. can) — I used more than half a huge jar from Costco
3 tablespoons finely chopped cilantro
2 scallions, white and light green parts only, thinly sliced (about 1/4 cup)

IMG_4260[1]

Preparation

1. In a small bowl, whisk together oil, lime zest and juice, garlic and salt until combined.

2. In a medium bowl, combine avocado, hearts of palm, cilantro and scallions. Pour dressing over avocado mixture and gently fold together. Season with additional salt, if desired.

IMG_4265[1]

This was just so good.  Definitely needs that salt.  So fresh, so delicious.  I ended up making it two days in a row for appetizers.  Served it with crackers.


Crunchy Turnip, Apple, and Brussels Sprout Slaw

I attempt to try food I ‘don’t like’ at least once a year. But the other day I came across a recipe with something I just sort of dismiss because you don’t have the easy attempt or common offer to eat it, it’s not many people’s favorite and it’s not staring at you in the grocery store — turnip(s).  So, when I was having a couple friends over for dinner the other night and preparing a veggie meal, this was a great time for me to give these guys a try.

The recipe I opted for is from Bon Appetit’s January issue — Crunchy Turnip, Apple, and Brussels Sprout Slaw.  Well, since this is from the January issue, the main ingredient is not in (high) season right now.  Luckily Whole Foods had it (this was after a couple other stops when I was debating changing my menu).

Ingredients

3 tablespoons fresh lemon juice
2 tablespoons olive oil
1 teaspoon finely grated peeled ginger
Kosher salt and freshly ground black pepper
2 small white turnips, peeled, cut into matchsticks — apparently one the size of a softball, which is ‘normal’, is equivalent to 2 small
1 medium sweet-tart apple (such as Pink Lady), cut into matchsticks — I couldn’t find one, so did the happy medium — some Granny Smith, some other Red one
4 oz. brussels sprouts, leaves separated
1 teaspoon poppy seeds, plus more — gotta love Whole Foods bulk section!

IMG_2574[1]Whisk lemon juice, oil, and ginger in a large bowl; season with salt and pepper.

For the turnips and apple, I went to town with the V-slicer, with the attachment to make those beautiful matchsticks.  Oh I love the kitchen!

Add turnips, apple, brussels sprouts, and 1 tsp. poppy seeds and toss to coat. Serve slaw topped with more poppy seeds.

IMG_2583[1]

Quite the salad.  There was such a nice crunch to all of it, and the dressing was delicious.  I love that since the key ingredients were in matchsticks they weren’t overwhelming.  I ate turnips again!!!  Had I not known there was turnip in there, wouldn’t have been able to tell you.  Could almost have been jicama.  One thing I’m surprised about is that this is published in the January issue since it’s a no-cook, cold salad.  The only thing I could think is on the turnip being more of a winter root veggie.  Thoughts?  I will definitely save this for summer.

White Beans with Broccoli Rabe and Lemon

Got around to making a recipe from my pile of them that I’ve been meaning to get to for awhile.  This time I took a stab at White Beans with Broccoli Rabe and Lemon from Bon Appetit.  It sounded interesting because you actually eat the lemon.  Had to try it.

Ingredients

Servings: 4

  • 3 tablespoons olive oil
  • 1 small lemon, very thinly sliced, seeds removed
  • 2 anchovy fillets packed in oil
  • 4 garlic cloves, thinly sliced
  • ½ bunch broccoli rabe, chopped
  • Kosher salt and freshly ground black pepper
  • 2 15-oz. cans cannellini (white kidney) beans, rinsed
  • ¼ cup fresh flat-leaf parsley leaves
  • 2 tablespoons finely grated Parmesan, plus more for serving
  • Crushed red pepper flakes (optional)

IMG_2526[1]-Ok, the first fun part of this was getting the broccoli rabe at the store.  It was mixed in with every other one of the leafiest, darkest greens possible.  It was also labeled by its non-normal name — rapini.  Why must they have done this to me?  I was about to fold and just use broccoli.

-Heat oil in a large Dutch oven or heavy pot over medium heat. Add lemon, anchovies, and garlic. Cook, stirring occasionally, until lemon is softened and brown in spots and anchovies fall apart, about 5 minutes. Add broccoli rabe; season with salt and pepper and cook, tossing occasionally, until bright green and crisp-tender, about 5 minutes.

 -Add beans and ½ cup water to pot. Bring to a boil; reduce heat and simmer, stirring occasionally, until flavors have melded and liquid is reduced by half (you still want it to be saucy), about 5 minutes.  In the middle of making it, I decided there was not nearly enough broccoli rabe in there, so added a ton more (that’s why below some stuff is bright green, some is less so).  Mix in parsley and 2 Tbsp. Parmesan.
-Transfer to a platter, sprinkle with red pepper flakes, if desired, and top with more Parmesan.
IMG_2532[1]
This was quite good.  The lemon was nice and soft and gave good zing to the dish.  Definitely keeping the recipe.

Rice Salad with Pecans, Fennel, and Herbs

Was flipping through a (sort of) recent Bon Appetit issue the other day (January 2015) and came across a recipe that looked tempting.  With the ‘warm’ weather — I’m talking upper 50s and sunny after 8″ of snow last week — it was just far too appealing.  It’s essentially a no-cook recipe, which was a bit off for a January recipe.

Red Rice Salad with Pecans, Fennel, and Herbs

1 cup red rice (I used the priceless Trader Joe’s microwave rice)
1 small fennel bulb, very thinly sliced
1/4 medium red onion, thinly sliced
3 tablespoons fresh lime juice, divided
2/3 cup pecans, divided
1/4 cup olive oil
1/2 cup cilantro leaves and finely chopped tender stems
Kosher salt, freshly ground pepper
Toasted pistachio oil or almond oil (for serving; optional)

IMG_2488[1]

Directions

Cook rice according to package directions. Spread out on a rimmed baking sheet; let cool.

Meanwhile, toss fennel and onion with 2 tablespoons lime juice in a large bowl and let sit, tossing occasionally, until lime juice is almost entirely absorbed, 10-15 minutes.
So at this point, since it had to be thinly sliced, it was time to pull out the V-slicer/mandolin.  Had such a great time!

IMG_2511[1]IMG_2512[1]Coarsely chop 1/3 cup pecans; finely chop remaining nuts. Laziness here, bought them that way — and, a heck of a lot cheaper for some reason.  Cook in olive oil in a small saucepan over medium-low until golden brown, 5-10 minutes. Let cool.

Add rice and pecans to fennel mixture along with remaining 1 tablespoon lime juice and toss to combine. Gently fold in cilantro; season with salt and pepper. Serve drizzled with pistachio oil, if desired.

*Do ahead: Rice salad (without cilantro) can be chilled up to 1 day. Bring to room temperature before serving.

This salad was mouthwatering.  I did not expect it to be this good.  Wow.  It could also easily be made with quinoa and/or another nuts.  Will be a perfect summer recipe.  Wow, delicious.

IMG_2507[1]